Stations, rotations, centers, choice boards, boxes with work in them that students are supposed to somehow independently complete... They have many names, but all bring the same struggles. Time management, monitoring all students while trying to pull a small group, coming up with new stations, early finishers. The list goes on and on! I get it. This is my fourth year of teaching and I'm in no way an expert, but I finally feel like I've got this whole stations business down.
My small groups are called CREWS, which is a system I created, and I promise I'll do a post and put it up on TPT as soon as I get a minute after January back to school craziness. In this post, I'm focusing on the "C" part, which stands for choice boards. Last year, I used choice boards alone and just included independent reading and writing in some of the boxes. I absolutely love these because I am all for putting the responsibility in the kids' hands. Students are more likely to buy into the stations and complete them if they get to pick what they do. The choice board that works best for me is a 6 square board. This provides enough options to keep students busy so that I don't have to switch out stations too frequently. These usually last about 3 weeks because students are also coming back to small group, spending time on writing, or independently reading. You can also create a variety of boards for different students in your class. For example, students that will be spending a lot of time in small group might need smaller boards.
My small groups are called CREWS, which is a system I created, and I promise I'll do a post and put it up on TPT as soon as I get a minute after January back to school craziness. In this post, I'm focusing on the "C" part, which stands for choice boards. Last year, I used choice boards alone and just included independent reading and writing in some of the boxes. I absolutely love these because I am all for putting the responsibility in the kids' hands. Students are more likely to buy into the stations and complete them if they get to pick what they do. The choice board that works best for me is a 6 square board. This provides enough options to keep students busy so that I don't have to switch out stations too frequently. These usually last about 3 weeks because students are also coming back to small group, spending time on writing, or independently reading. You can also create a variety of boards for different students in your class. For example, students that will be spending a lot of time in small group might need smaller boards.
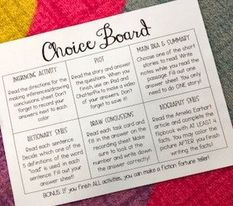
The choice board can have any number of choices, based on how differentiated you want it and what works for your class.
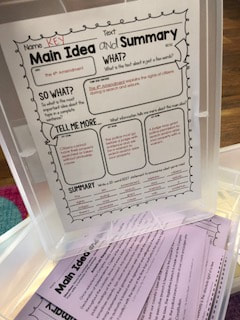
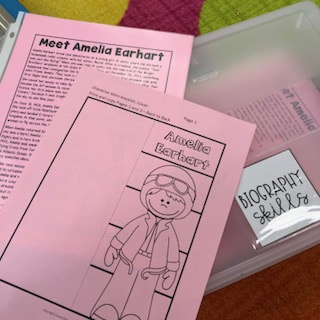
After you figure out how you want to set up your choice board, coming up with the activities is the next step. I make the choice board based on what we are currently learning about and also include a few review activities that students need extra practice on. I find most of the activities on TPT or from my district's database. I might also include a technology activity or something that I've made specifically for a group of students. I try not to make things too complicated because, remember, it's the students who will be working on these independently! It should be used as a review time, not a time to roll out new or just-taught content.
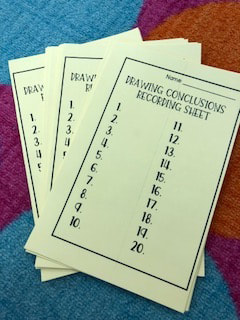
Think about your fast-finishers. At the bottom of my choice boards, I'll give students an option for if they finish early. I also set up book clubs with students who I know will need some extra work. There are so many great resources on TPT for this! Again, giving students the opportunity to control their learning by coming up with schedules for reading, questions for each other, and a final project to present.
A major headache with stations is the setup and organization. Make your system work for YOU, but whatever it is, make it simple. When I taught 5th grade, I overcomplicated stations and made them much more difficult for myself, and for the kids. This is a time for you to get some good instruction in during small groups, and for other students to review and work independently, not perform rocket science experiments!
First, think about HOW you want to set up your stations. What do you want your system to look like? Buckets? Shelves? Folders? Think about what you already have. Remember, don't make it complicated! I LOVE these Sterilite clip boxes. I bought mine at Dollar General for about $4, but they are also on Amazon. Click the picture for the link. They are big enough for full sheets of paper and roomy enough for tasks cards or iPads. Since I use a 6 option choice board, I have 6 boxes that live at the front of my room holding each of the stations. Unless students are working on partner work, I have them take materials back to their desks. This all gets set up when we talk about rules together. Make it work for your classroom. Whatever floats your stations boat!
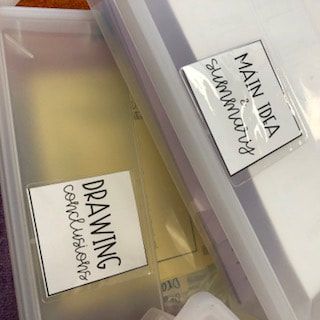
| Next, set up your choice board, menu, or checklist so that you know what students will be working on. After you've printed or made all of the resources, get ready to assemble the stations. I like to color coordinate the stations so that students know what recording sheet goes with what activity and back into what bucket. This is a little OCD, but it really helps the kids not get things mixed up! I also use plastic sheet protectors when I don't want the students to write on anything. After your organize the stations into each bucket, start to label your boxes or system. I love the clear label slots from the Target Dollar Spot, but if you can't find those, there are some similar on the link below. You can also label with Post-It Notes or painter's tape. | 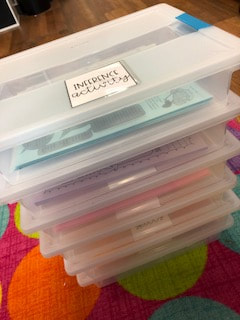 The BEST boxes! Click the photo for link. |
So, you've figured out how you want your stations to flow, you know where they'll be stored, you've put the boxes or choices together, and you're ready to roll it out to the students. Now what?
The biggest takeaways from this should be that it's about how stations work for YOUR classroom and YOUR students taking ownership of their learning with independent work. If this is something totally new for you, start from the beginning by establishing some ground rules. Don't come to the teacher table if there is a group, partners means two people, voice level zero or one, return the materials to the correct place, etc. Do this together as a class so that students remember to follow the rules EVERYONE came up with.
Students will also need a place to keep information. We have a pocket in our reading folders designated to CREWS, so students put all work from stations in there and turn it in when we switch out choice boards every few weeks. This way, all of their stations work stays together and none of it gets lost in our other turn in trays! I've also seen separate folders for stations, book bags, galloon baggies, pencil bags, and all kinds of creative ways to store materials!
Phew! That was a lot of information. Like I said, I am no expert, but I know how tedious and frustrating this process can be, so I hope you've gotten something from this post. Trial and error, y'all. If it's not working for your kids, then make an adjustment. You've got this! Don't forget to teach like you mean it!

You've got this!
Meg
Meg
 RSS Feed
